<img height="1" width="1" style="display:none" src="https://www.facebook.com/tr?id=289291844809425&amp;ev=PageView&amp;noscript=1">
Less Is More Blog Productivity Tips

Join us at the Webinars

2021_Webinars_Schedule_People-OnTheGo

Click for our Webinars Schedule.

The Perfect 15-Minute Day Method is here!

Promotiona_Video_Thumbnail_Rev2.jpg

Order the book, eBook, journal, or eCourse to get started right away and inject a healthy dose of accomplishments and happiness in your workday and beyond!

Learn more!

Get Our Free eBook

The Results Curve: How to Manage Focused and Collaborative Time

Less-Is-More Blog by Pierre Khawand

Question & Answer: What do I do with the Sent Items in my Microsoft Outlook mailbox?

Posted by Pierre Khawand on Tue, May 17, 2011 @ 06:00 AM

sent items in outlookCindy asked "I am trying to categorize and file the messages in my mailbox.  What do I do about the Sent Items folder?  I get a ton of emails and send out a lot; It would take a lot of time to organize these messages. Or should I  wait and do them in batches?" This is actually one of the common questions that we get at the workshops and I would like to tackle it from two different angles.

First: Remember the 80/20 rule

80% of our results come from 20% of our effort. This rule applies to e-mail just as well. It is likely that 80% of our "e-mail" results come from 20% of our emails. Therefore, it is important for us to give these 20% careful attention and organize them properly. The rest of the e-mail messages should be processed as quickly as possible if at all.

When it comes to the Sent Items folder (which is by the way the Microsoft Outlook terminology; so for those using other e-mail applications, please extrapolate; Google users, please check out the Google related resource below),  I would recommend organizing the top 20% and letting the rest stay in the Sent Items and then get archived periodically.

Second: Organize the top 20%

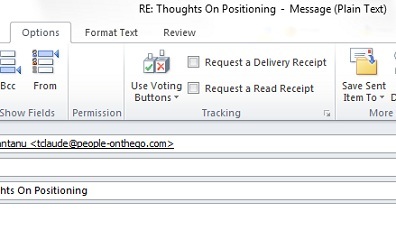
When it comes to the top 20%, after you compose your message and just before you send it, click on the Options tab:
Outlook Sent Items 1c

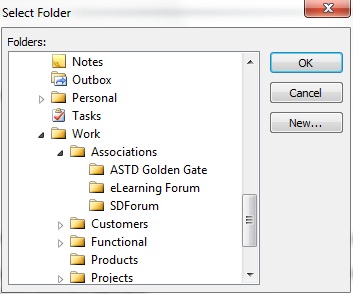
Then notice the Save Sent Item To button, and click on it, and then select the Other Folder menu option from the popup menu. The following window opens:
Outlook Sent Items 2

This allows you to decide which folder you want to save the sent item in. Please note that the exact steps and screens may be slightly different in your version of Microsoft Outlook (the above screens are taken from Microsoft Outlook 2010).

While this process takes a few extra steps, users tell us that they find it easy and convenient (more so than doing the organization later) because the information is still fresh in their mind, and if they do it now, they have one less thing to think about and do later.

Additional Resources


Topics: Microsoft Office 2007, email management

Question & Answer: What is the best way to share the task list and Gantt chart in Microsoft Project with people who only use Word and Excel?

Posted by Pierre Khawand on Sun, Jun 06, 2010 @ 10:45 PM

Microsoft Project Tutorial
There are many ways to share Microsoft Project data with users who don't have access to Microsoft Project. I would like to point out two approaches, one that consists of exporting Microsoft Project data to Excel, and another that consists of taking snapshots of Microsoft Projects views and making them available as pictures.

Approach #1: Exporting to Excel

First: From the File menu, select Save As, and then provide a file name, and select the file type "Microsoft Excel Workbook", and click Save.

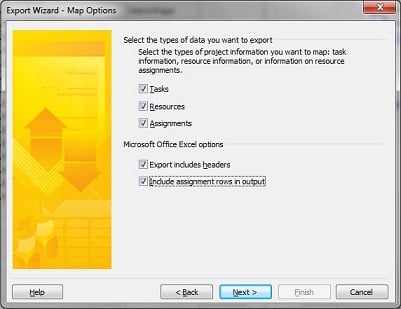
Second: The Export Wizard opens up, which will guide you through defining a "map" for the export, in which you specific what data you would like to include.  

Microsoft Project Tutorial

Third: Once you define the mapping and click Finish, the resulting Excel workbook is generated. 

This process of defining a map involves specifying the fields that you want to export from Microsoft Project and the corresponding column headings in Excel. This can be a tedious process the first time you do it. However, the good news is that you can save the map, and then reuse it when you perform this process again in the future.

Approach #2: Saving reports as pictures

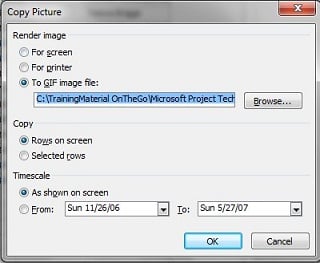
Microsoft Project 2007 makes this easy by offering the "Copy Picture" option in the Reports menu.  The following settings are available:

Microsoft Project Tutorial

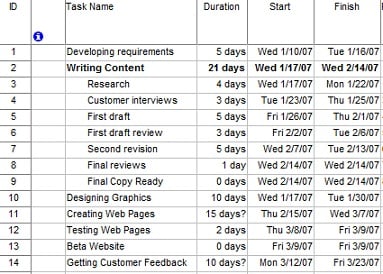
For instance, here is a snapshot of a Gantt Chart that was generated using the "Copy Picture" approach, and using the "To GIF image file" option (split into 2 for better readability):

Microsoft Project Tutorial
 
Microsoft Project Tutorial 

Additional Resources

Topics: Microsoft Office 2007, Microsoft Project Training

Question & Answer: How do I indicate that a task that is in progress is going to take longer than estimated in Microsoft Project?

Posted by Pierre Khawand on Tue, Jun 01, 2010 @ 07:34 AM

Microsoft Project Task Tracking
While it is easy to mark a task as complete or to indicate a percentage of completion in Microsoft Project, it may not be as obvious how do we mark a percentage of completion for a task and at the same time indicate that this task is going to take longer than expected--so that Microsoft Project recalculates the remaining tasks start dates and adjust the project schedule  accordingly. This is one of the questions that comes up at our Microsoft Project Techniques workshops and which has an easy answer.

Indicating a percentage of completion and updating task during in Microsoft Project


First: Select the desired task

Second: From the Tools menu, select Tracking, and then Update Tasks:

Microsoft Project Tutorial

Third: Instead of entering a percentage of completion, enter the actual duration that has been spent on this task already (let us say 3 days in this case) and the remaining duration to complete the task (let us say 4 days in this case):

Microsoft Project Tutorial

In other words, this task, which was estimated to be a 5 day task, has already taken up 3 days, and it is expected to take 4 more days to complete--for a total of 7 days.

Once you press Ok to confirm your updates, Microsoft Project adjusts the schedule accordingly. 

That easy!

Additional Resources


Topics: Microsoft Office 2007, Microsoft Project Training

Accomplishing More With Excel: Sorting Excel PivotTable Reports using columns instead of grand totals

Posted by Pierre Khawand on Mon, May 24, 2010 @ 08:39 AM

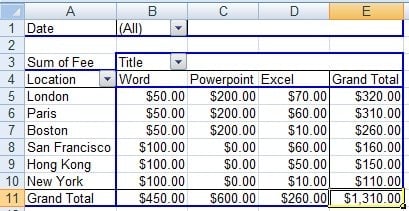
When you are working with a PivotTable report, you can easily sort the report manually or alphabetically in ascending or descending order, but you can also sort it by ascending and desending order of the grand total as shown in the report below: 

PivotTable Sort Grand Total

But how about if you want to sort the report by the PowerPoint instead of the grand total?

There is a way:

First: Right-mouse click on any of the location field (or any of the location items such as San Francisco for instance) and then from the popup menu, select the "Sort" menu item, and then the "More Sort Options…" sub-menu item. The Sort (Location) window opens up. 

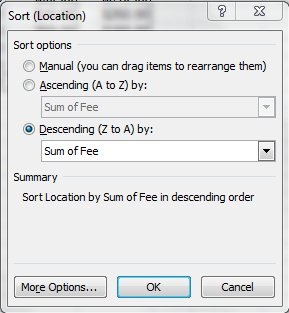
Second: Click the "Descending" option and select "Sum of Fee" from the dropdown box:

PivotTable Reports Sort Options

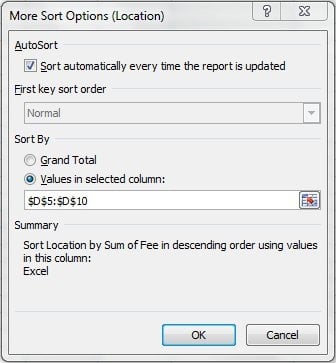
Third: Click the "More Options" button. The More Sort Options (Location) window opens up. Click the "Values in selected column" option and then enter the desired range (in this case if we want to sort by the values in the Excel column, this would be $D$5:$D$10):

More options in Excel PivotTables

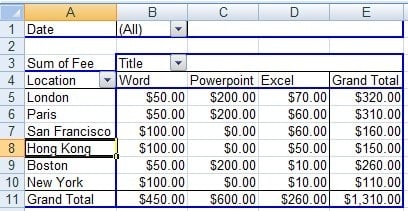
Voila! Here is the resulting report

Excel PivotTable Reports sorted by column
 

Additional Resources


Topics: Microsoft Office 2007, Microsoft Excel Tutorial

Accomplishing More With PowerPoint: Using SmartArt Graphics in Microsoft PowerPoint to enhance your presentation instead of hindering it!

Posted by Pierre Khawand on Thu, May 06, 2010 @ 04:54 PM

SmartArt graphics can be very effective and yet they can be overused or misused and therefore backfire instead of enhance your presentation.

Examples of good uses of SmartArt Graphics

This SmartArt Graphic (Continuous Block Process) clearly illustrates the sequential nature of these funding rounds:

PowerPoint tutorial SmartArt Graphic

The following SmartArt Graphic (Upward Arrow), which we use in our collaboration technologies workshops, shows the spectrum of purposes that one can have for one's blog.  The upward arrow depicts the increased value that blog authors can get from their blog as they start to move beyond publishing information into engaging and motivation their audiences:

PowerPoint Tutorial SmartArt Graphic


Example of not so good uses of SmartArt Graphics

This SmartArt Graphic here is ambiguous. It is not clear what the relationship is between People, Technology, and Process. The pyramid can be interpreted differently by different people. This will cause the viewer to have to think and make assumptions. As Steve Krug puts it in his book Don't Make Me Think, this will distract and confuse the user.

PowerPoint Tutorial SmartArt Graphic 
 

What do you think of this SmartArt Graphic?


PowerPoint Tutorial SmartArt Graphic

Do you have examples of SmartArt Graphics (or charts/visuals) that are well done and some that are not? E-mail them to training@people-onthego.com. We will collect them and publish the results in a future article.

Additional Resource


Topics: Microsoft Office 2007, Microsoft PowerPoint Training

Question & Answer: How do I set a password to protect my Microsoft Excel Workbook?

Posted by Pierre Khawand on Sun, May 02, 2010 @ 05:55 PM

If you would like to password protect an Excel workbook, the process is easy and it is the same process by which you can also protect other Microsoft Office documents such as Microsoft Word and Microsoft PowerPoint. The steps below demonstrate how to assign a password for opening and for modifying an Excel workbook.

Please note while the steps below illustrate the process in Microsoft Excel 2007, the steps are pretty much the same in Microsoft Excel 2003 and even Microsoft Excel 2010. 

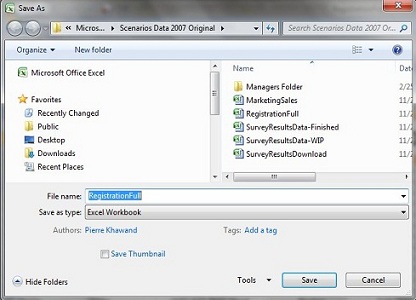
First: After you save your document, use the Save As option from the Office Button menu to open the Save As window.

Excel 2007 Password Protect

Second: In the Save As window, click on the drop down arrow next to the Tools button that is near the Save and Cancel buttons as illustrated below.

Excel 2007 Password Protect

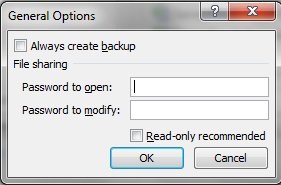
Third:  Then from the list of options, select the General Option to get the General Options window:

Excel 2007 Password Protect

You can provide two different passwords, one for opening the document, and one for modifying the document. This allows you to provide certain people the ability to view the document but not edit it, while allowing only designated people to edit the document.

You will then be prompted to confirm the passwords you have entered, and then once you confirm, and save the document, you will also be prompted to confirm that you want to replace the existing document, in which case you want to click Yes to confirm.

One word of caution though: "keep the password in a safe place."

Additional Resources

The Microsoft Excel Techniques workshop (see upcoming Webinar on May 11, 2010)

Topics: Microsoft Office 2007, Microsoft Excel Tutorial

Question and Answer: How do I suppress the #N/A results when using VLOOKUP in Microsoft Excel?

Posted by Pierre Khawand on Wed, Mar 17, 2010 @ 09:01 AM

Microsoft Excel VLOOKUP Suppressing #N/AThis question comes up from time to time in our Microsoft Excel workshops. VLOOKUP is one of the very helpful functions in Microsoft Excel. It allows us to lookup values from various lists and use the results as necessary.

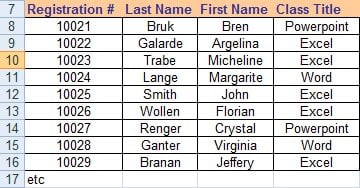
For insatnce, I might have the following list:


Microsoft Excel VLOOKUP

And if I would like to find the Class Title that corresponds to Registration Number 10024, I can use VLOOKUP as follows:

=VLOOKUP(10024,A7:D16,4,FALSE)

In this case, VLOOKUP tries to find an exact match for 10024 and if it finds it, it returns the Class Title. In this case, it would return Word.

But what if VLOOKUP doesn't find the desired results. For instance if I am try to look for Registration 12020 (which doesn't exist in the list), then VLOOKUP would return: #N/A

While this may not be a big deal in some situations, it can be quite distracting if I am using VLOOKUP to populate a column in a report from another table (which is what VLOOKUP is best at). Suddenly my report may have several of these #N/A's which ideally would be replaced by something more user friends or be suppressed all together.

How can you manage or suppress the #N/A?

To manage or suppress the #N/A's, you need to make use of 2 functions:

  • ISNA() which determines if the result of the VLOOKUP is #N/A
     
  • IF() which allows you to replace the #N/A result or suppress it

This is the syntax of the "smarter" VLOOKUP statement:

=IF(ISNA(VLOOKUP(12020,A7:D16,4,FALSE)),"Not Found",VLOOKUP(12020,A7:D16,4,FALSE))

Or if you want to suppress it all together:

=IF(ISNA(VLOOKUP(12020,A7:D16,4,FALSE)),"",VLOOKUP(12020,A7:D16,4,FALSE))

Additional Excel Resources

Microsoft Excel Techniques workshop

Advanced Excel PivotTables

Microsoft Excel Macros

Topics: Microsoft Office 2007, Microsoft Excel Tutorial

Question and Answer: How can I see my Microsoft SharePoint Calendar events in Microsoft Outlook?

Posted by Pierre Khawand on Wed, Feb 17, 2010 @ 01:50 PM

Microsoft Office 2007We get this question often which makes perfect sense. After all, if you are using Microsoft Outlook, and have the benefits of the Outlook Calendar, doesn't make sense to want to view your SharePoint Calendar events in the same Calendar and not have to go to SharePoint to manage these events?

The answer is yes you can view your Microsoft SharePoint Calendar events in your Outlook Calendar and it is simple to set that up. Below are the steps that are involved in connecting your SharePoint Calendar to your Outlook Calendar, however, keep in mind that if you are using Outlook 2003, this would be a one way connection. You will be able to view the events but not edit them or add new events. However if you are using the Microsoft Office 2007 suite of applications, you will be able to make updates in Outlook 2007 and these updates will show up in SharePoint.

Here is the process of connecting your Microsoft SharePoint Calendar to your Outlook Calendar

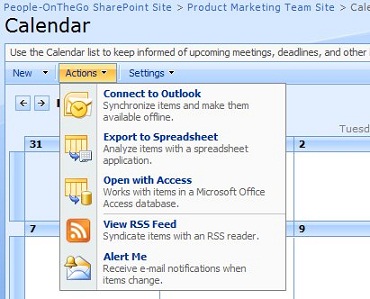
From your SharePoint Calendar, select Action, and then select Connect to Outlook

microsoft office 2007

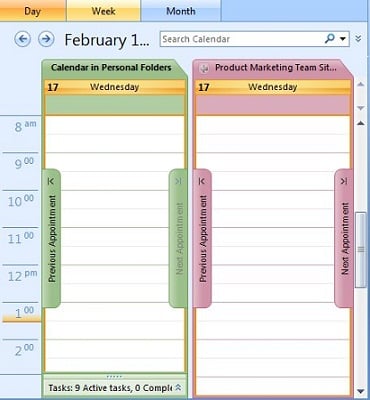
As soon as you do so, you will be prompted for your user name and password and a new calendar will be created in Outlook:

microsoft office 2007

And now you can view this Calendar in Outlook and if you are using Microsoft Office 2007, you will be able to update it from Outlook.

More Resources


Topics: Microsoft Office 2007, Microsoft SharePoint Training

Accomplishing More With Word: Using Styles to create table of contents in Microsoft Word documents

Posted by Pierre Khawand on Tue, Feb 02, 2010 @ 09:01 AM

Microsoft Word TrainingWhen it comes to formatting Microsoft Word documents, we still see so many inefficiencies and inconsistencies, not to mention documents that are not user friendly and not easy to navigate. But there is a way to change this.
Using Styles in Microsoft Word can remedy the situation (or at least a step in the right direction), not only making formatting easy and efficient, but also enabling easy creation and maintenance of table of contents. If you use Styles, you can create a compelling table of contents (with all the bells and whistles) instantly and as your document continues to evolve, update it at once.

Are you ready?

First: Instead of directly formatting your headings (the headings of the main sections of your document), use the Heading 1, Heading 2, and Heading 3 Styles to do so. These are paragraph styles. This means you don't need to select the whole text of your heading in order to format it. All you have to do is click anywhere in the text, and click on the desired heading on the ribbon, and the formatting gets applied.

In Microsoft Word 2007, this is what the ribbon looks like with the Styles easily available:

Microsoft Word 2007 Styles


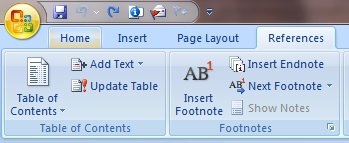
Second: When you are ready to produce your table of content, select the References tab, and then click on Table of Contents:

Microsoft Word 2007 References Tab


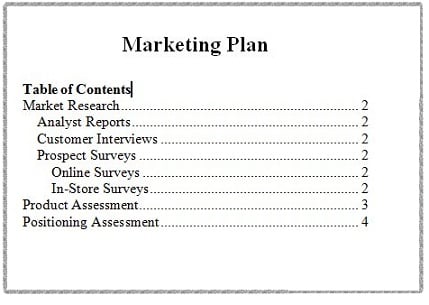
Third: Select one of the formats from the popup menu that gets displayed when you click on Table of Contents, and magically, the table of contents appears. Not only it appears, by default it displays the page numbers, hyperlinks to each section, and looks pretty! Of course you can change all these options as desired.

Microsoft Word 2007 Table of Contents Sample


Stay tuned for more Microsoft Word 2007 tips this week in the complimentary lunch and learn webinar Microsoft Word 2007 Tips by Kim Silverman.

More resources to check out

Topics: Microsoft Office 2007, Microsoft Word Training

Question and Answer: When should I use Microsoft SharePoint and when should I use a wiki?

Posted by Pierre Khawand on Wed, Jan 27, 2010 @ 11:48 PM

document collaborationThis question comes up often during our workshops. Participants see that both platforms can help with document collaboration and information sharing, and they start to wonder which platform is more appropriate for their needs.

While this can be a long discussion, I am only going to provide a few key insights here, and please add your comments below so others can benefit from your experience.

What is SharePoint best at?

  • More appropriate for managing "documents."
  • More appropriate for managing calendars and tasks that are structured.
  • More suitable when you want to setup several levels of user permissions.
  • More suitable when you are using Windows and so is your team/company and therefore integration with Windows, with Microsoft Office Applications, and Exchange/Outlook is desired or mandatory.

What are wikis best at?

  • When you want to co-create content at a more granular level (quickly and easily update sentences and paragraphs, expand and branch into new pages).
  • When you are at the early stage of an idea or a project and flexibility and innovation is more important than structure.
  • When everyone is on equal footing and involvement/engagement are key as opposed to having a hierarchal structure and a structured review process.
  • When users are using a variety of platforms (Windows, Macs, others).

Having said the above, it is common to see teams use both tools. Some projects and initiative require the flexibility and ease of use of a wiki while others require the more structured approach that SharePoint offers. Sometimes it is easier to start a project using a wiki and then when the project develops further and formal documents start to take shape, SharePoint can then be introduced.

More resources to check out

Topics: document collaboration, emerging technology, Microsoft Office 2007, Microsoft SharePoint Training